

How to turn a PowerPoint into a video? PowerPoint is a well-known presentation tool, as you all know, used to present and exhibit a message. It includes numerous designs, topics, and applications to assist you with building proficient presentations. Imagine a scenario in which you invest a great deal of time and energy, making a really engaging presentation, and you need to share it with somebody who doesn’t have Microsoft Office installed. That may be a problem for you.
You can share your presentation without any problems, but the bad news is that they cannot even open your presentation. But if I turn a PowerPoint into a video, then? That’s a whole other story. You may transform your PowerPoint presentation into a video, and it may very well be effectively seen by the vast majority with an who will receive the presentation. If you don’t have the time to read this full post, try to follow these simple steps:
- Click the File tab to show the file options.
- Scroll down to Export and navigate to the section “Create a Video”.
- Select your preferred video settings (video quality, timings and narration, video size, etc.).
- Click on the Create a Video button.
- Choose a filename, and video type (.mp4 or .wmv), then save.
Another advantage of transforming PowerPoint into a video is it is an extraordinary method to repurpose your PowerPoint presentation to another medium. In fact, video as a media form is rapidly turning into a natural part of an organization that’s becoming more and more digitized.
Even though PowerPoint isn’t made to be used as a video tool, and there are numerous video tools, applications, and other programs accessible, you may be figuring for what reason would it be optimal to use PowerPoint as a video tool? In this article of how to turn a PowerPoint into a video, we will, of course, highlight the benefits.
3 Reasons to use PowerPoint as a Video Tool
- As we wrote above, you can’t distribute your presentation to somebody who doesn’t have PowerPoint or Office 365 installed on their device.
- You may be a great PowerPoint designer, but you may not be as good at video editing. The learning path to master both PowerPoint and a video editing tool is quite long; believe me, I know.
- You may have invested a significant amount of time and energy, creating a PowerPoint with animations, transitions, etc. and don’t want to start from scratch with a video editing tool.
The three reasons mentioned above are great reasons to ask yourself how to turn a PowerPoint into a video. In this article, we will teach you how to do precisely that. Before we move on, there are some common questions I would like to answer before.
Can all PowerPoints be Converted to Video?
If you are using Office 365 and PowerPoint 2019/2016, you are all covered. This guide of how to turn a PowerPoint into a video can be used safely. Almost all components and effects in these versions of PowerPoint can be used and converted to a video. However, some soms features are excluded. Older embedded media from older versions of PowerPoint, such as QuickTime video, OLE/ActiveX Controls, and Macros, may not be possible to convert to a video in PowerPoint.
What’s the Output Format of the PowerPoint Video?
The main output formats of PowerPoint videos are MP4 and/or WMV video files as of today. This list of output formats may change over the course of time. Drop a comment below if it’s time to update the list.
What Video Quality do you Advice me to use When I Save a PowerPoint Video?
When you are learning how to turn a PowerPoint into a video, it’s also essential to learn the consequences of selecting different video formats and quality levels. For example, if you are converting a PowerPoint to a video with the purpose to e-mail the presentation to colleagues, you may want to use lower video quality due to the size of the output video.
I know it’s tempting to select the Ultra HD (4K) format. The video quality is amazing, but the consequence is that the file size becomes HUGHE! So, if you are about to distribute the video to others online, it’s more suitable to select the 720p or 1080p quality.

If you want to save even more file size, I suggest going down to 480p. However, you should avoid this if you are expecting your audience to watch the video on larger monitors. The video will be experienced as low quality; this will also affect the perception of your presentation.
Wow, that was quite a long introduction. So, let’s jump right into the tutorial of how to turn a PowerPoint into a video.
The Easiest and Most Efficient Way.
In the event that your presentation is prepared with timings, transitions, and animations, you may be stunned when I tell you how easy it is to turn a PowerPoint into a video. Below, I will guide you step-by-step on how to accomplish this.
Start with opening up your PowerPoint presentation you want to convert to a video.

Click on File, then Save As. Now, a dropdown menu appears in which you can select various options. Look for “MPEG-4” and “Windows Media Video”, this is the predefined video formats you can save your PowerPoint presentation as.
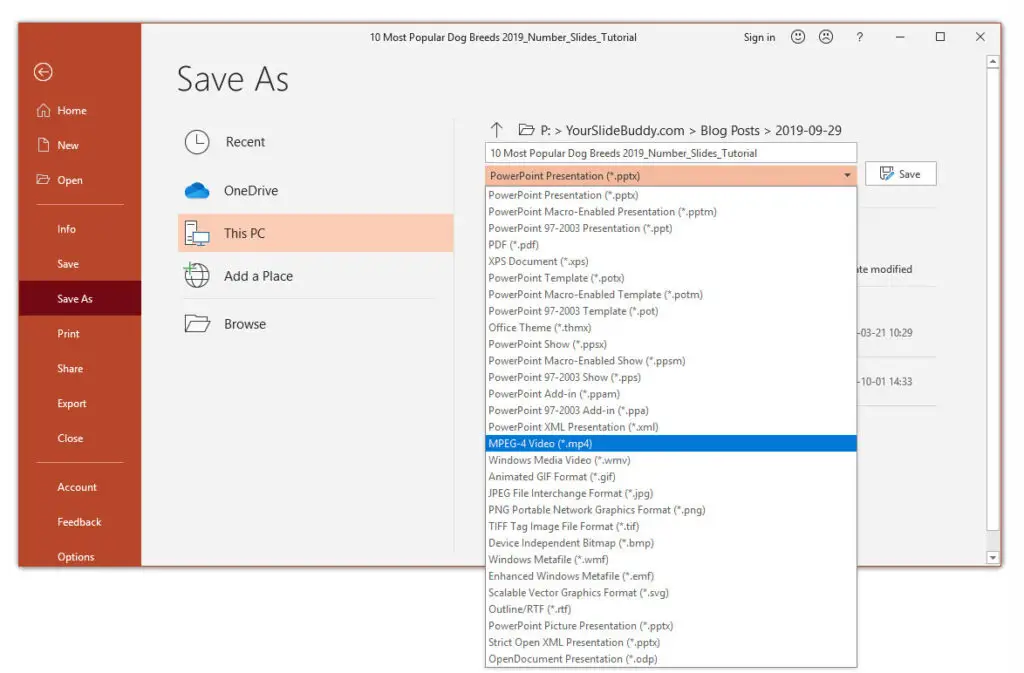
This is really simple, isn’t it? Yes, it is super easy, but the bad news for most of you readers is that this option is only available for presentations prepared with timings, etc. This is the easiest and efficient way of how to turn a PowerPoint into a video. If this method is not an alternative to you, keep reading.

Create a PowerPoint Video Using the Export Feature
Another very straightforward method is to use the export function to turn a PowerPoint into a video. Just navigate to File, then click export, select the properties that suit you the best, and then click Create a Video. Done.
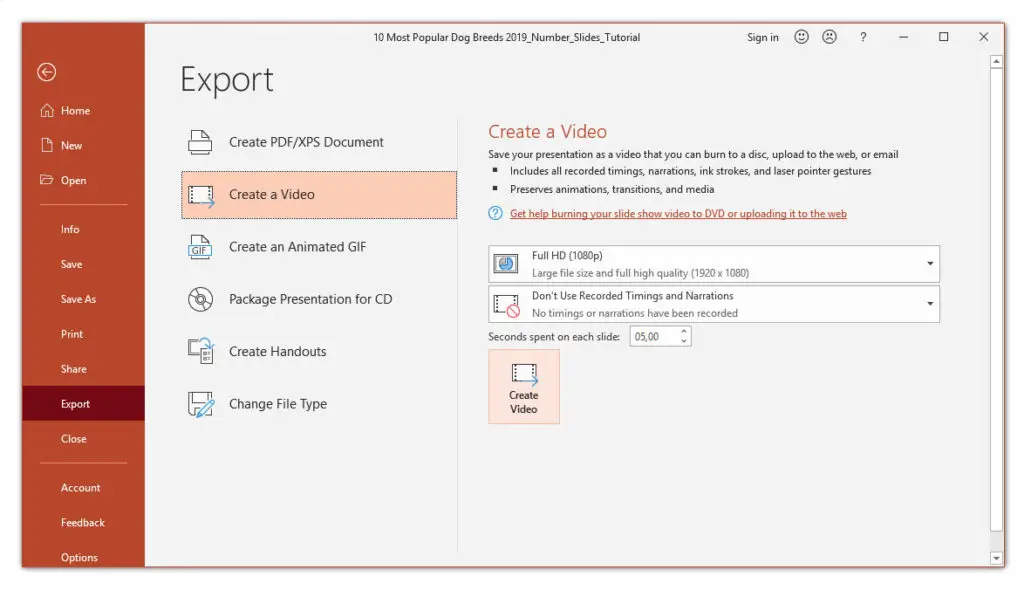
Select Video Quality
There are a couple of choices for you to choose that will affect how your PowerPoint video turns out. Start by choosing the appropriate quality.
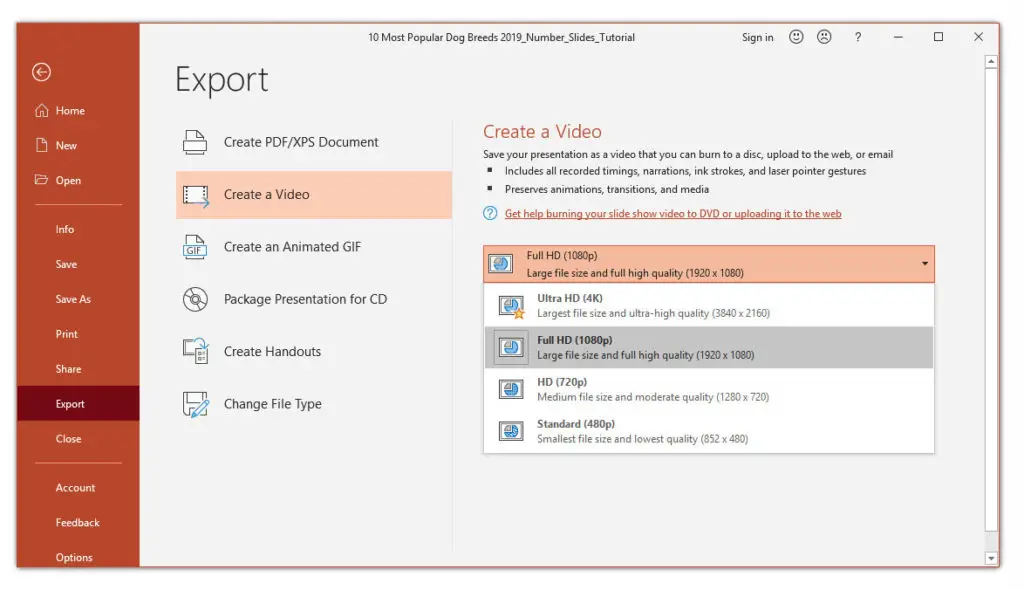
The decision you make will influence the clarity, resolution, and video file size, as we spoke about earlier in this article. The higher the quality, the bigger the file size will become.
I recommend using Full HD (1080p) in most cases, yet in the event that you have a slow Internet connection, or the file size becomes too large, HD (720p) will be good enough alternative in most cases. When learning how to turn a PowerPoint into a video, the quality and file size is aspects you have to keep in mind all the time.
Select The Timings
The following alternative controls to what extent each slide remains on the screen or the timings of your video. In other words, for how long will each slide be visible during the video.
In the event that you pick Don’t Use Recorded Timings and Narrations, each slide will have appeared for a similar amount of time. If and when you decide to use this option when turning your PowerPoint into a video, you can choose the number of seconds you need each side to remain on the screen before moving onto the following one.
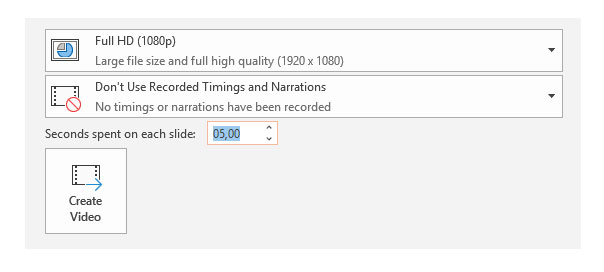
When you have selected the desired “Second spent on each slide”, just click Create video below and select a folder on your computer where you want to store your PowerPoint video.
This was partly the second method of how to turn a PowerPoint into a video. To make sure everything is satisfying, locate the video you just saved and play it. The slides will play for the time allotment you set previously. However, if you have slides with big chunks of text (not recommended btw), you may want to change the timings.
Change The Timings in a PowerPoint video
You may wish to do this to allow the watchers to be able to stay longer on slides with longer content. This can be practiced by picking an alternate timing setting.
While still in the Export area, select Record Timings and Narrations.
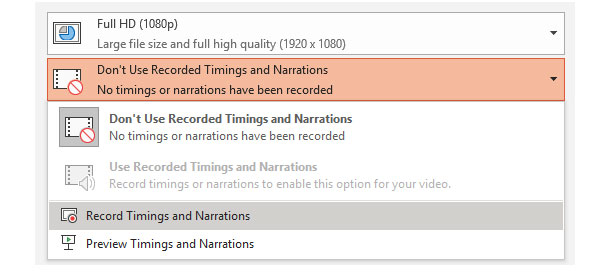
This alternative allows you to tweak to what extent each slide appears on the video and gives you a choice to record a voice-over as well. In the event that you need to record a voice-over, you have a few choices. To change your microphone settings, navigate to settings in the upper right-hand corner. Voice-over is actually a great tool to consider when learning how to turn a PowerPoint into a video.

You can likewise incorporate a video of yourself recording the video by choosing the Camera alternative from the settings the same settings menu. If you are recording a lecture or similar, this may be a great idea to give the presentation a more personal touch.
To begin recording your voice-over, click on the red Record button. PowerPoint will give you a couple of moments to prepare while it counts down from three to one.

When you are recording your voice, your PowerPoint is at the same time recording the timings for you. The number of minutes and seconds you spend on each slide will set the timings for the PowerPoint video. Thus, you may think of this as a live performance.
It is very intuitive to move to the next slide when you are done, just use the arrow buttons to move on to the next slide. When you are done recording, press the stop button and press the “X” in the top right corner to go back to the Export menu in PowerPoint. Your timings will now be saved. Timings are a really important topic when learning how to turn a PowerPoint into a video.

Now, just click on Create Video and save your PowerPoint video in your computer. Each slide in your video will currently keep going as long as it took you to do the voice-over when recording.
How to use Transitions, Animations, and Timings in PowerPoint
If you would like to set the animations, timings, and transitions before making the video, down below are a couple of methods of how to do as such. When you have all these things in place when you are done with your PowerPoint presentation, you can just use the easy methods instead of setting up timings, etc. when you are exporting.
Transitions in PowerPoint
If you are a frequent reader of this blog, you have probably read some articles about transitions, so here is a recap. Have you at any point seen a PowerPoint presentation that accomplishes something extraordinary that gets your attention between slides? Those effects are called Transitions in PowerPoint. Transitions are also really important when learning how to turn a PowerPoint into a video.
There are three different types of transitions you can decide to use in your PowerPoint presentation. I list theses down below:
- Dynamic: When featured between two slides, we will just move the placeholders, not the slides.
- Exiting: More detailed and more fascinating than subtle
- Subtle: Very simple transitions; just doing the job of transitioning.
At the point when applied with some restraint, transitions make your PowerPoint presentation look very professional. However, be careful since the overuse of transitions will have the opposite effect. You don’t want the transition effects to be on focus; it is your message that should be the focus of attention.

Apply a Transition
Select the slide from the Slide Navigation board where you need to apply the transition. This slide will show up after the change you style.
Click on Transitions from the top menu ribbon. Note that the default is always set to None. Hit the More button or the down arrow to enable the dropdown menu to see all the available choices.
At the point when you click a transition, you will consequently observe a preview of what it will resemble whenever you chose this. You can either utilize the transition for an individual slide or hit the Apply to All to utilize a similar change for all the slides in your PowerPoint presentation. Now you may understand why transitions are soo important when learning how to turn a PowerPoint into a video.
Customize the Appearance of the Transition
Each change has distinctive effect alternatives.
To pick the one best suitable for your needs, click on Effect Options, select one, and watch PowerPoint consequently show you a preview of your choice of effect.
Customize the Duration of a Transition
Pick the slide you need to change the timing for and search for the Duration field. As a default, the slide duration is set to 01.00.
How about we increase the duration of the transition to make progress a little slower in order to make slide more readable for the audience.

Click the option Apply to All to use the same transition time for all your slides. I recommend using the same style and duration for all slides in your PowerPoint presentation. However, in this case, when we are talking about how to turn a PowerPoint into a video, it may make sense for you to have different transitions.
If your ambition is to make a more entertaining and engaging video, some variations in transitions and timing may help you fulfill your purpose.
Make a Sound During the Transition
Yes, you read correctly, you can add a sound to your transition. However, this is not recommended since it’s soo difficult to incorporate sound effects and still maintain the PowerPoint presentation professional. I encourage you to play around with the option, but please think twice before using sound effects in your final presentation.
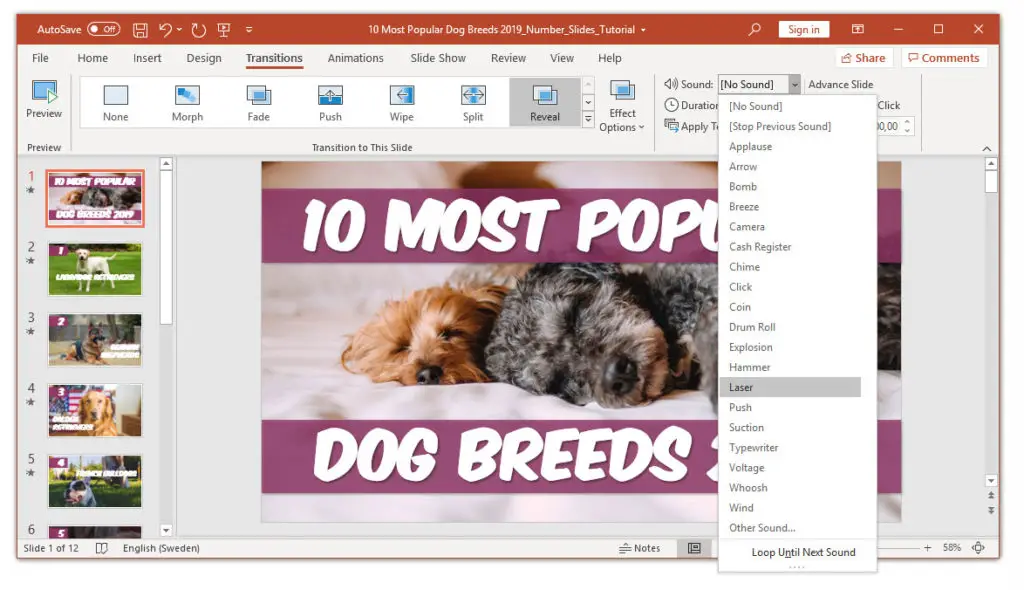
Click the dropdown menu alongside Sound from the top bar menu. Pick a sound; at that point, review it. To see the sounds, from the top bar menu, click Slide Show and afterward From Current Slide. So, will you use sounds when learning how to turn a PowerPoint into a video?
Move To The Next Slide in PowerPoint
If you are doing a live presentation in front of a crowd of people, you typically would press the spacebar or using your “clicker” to progress to the following slide.
But, as we are changing over the introduction to a video, you need to utilize the Advance Slides setting to computerize the procedure.

Presently you need to deselect the checkmark alongside On Mouse Click. In the After field, enter the measure of time you need the slide to be shown before moving onto the following one. We have now come quite far in our journey of learning how to turn a PowerPoint into a video.
How to Apply Custom Animations
Animations in PowerPoint add a dynamic effect to various components in your presentation; this is a really good thing to utilize when turning a PowerPoint into a video. The reason for existing is to cause to notice the key focuses, for example, shapes, tables, images, text boxes, and other objects.
Utilizing animations in your PowerPoint recordings makes it more captivating and energizing for the audience to watch. A portion of the kinds of animations you can add to your slides are:
- Making a picture show up or vanish.
- Moving an item around your slide.
- Changing the color or size of your content.
Include Animations in PowerPoint
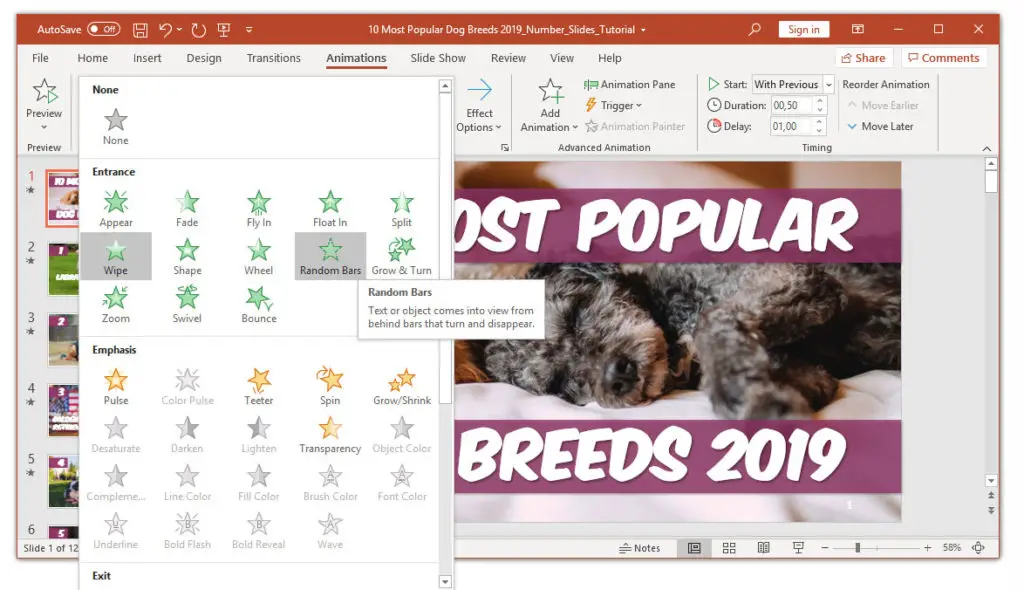
Animations are also really important when learning how to turn a PowerPoint into a video. Start by choosing an item to apply your animation to, click on Animations, and pick an alternative that you like. In the event that you don’t see the Animation Pane, click on it to open it.
Click on the Effect Options and pick one to use. Various animation has various choices and features.

To begin an animation, click on the dropdown menu beside Start and browse one of the choices underneath:
- On Click will begin the animation when you click a slide.
- With Previous will begin the animation simultaneously as the past activity on the past slide.
- After Previous will play it following the past animation finishes.
Hit the Duration button to set to what extent you need the animation to last. If you need to include some time before animation begins, utilize the Delay alternative. In the first chapter of this article on how to turn a PowerPoint into a video, I explained how to do this by recording yourself.
To include more animations, click on Add Animation and pick the one you need to utilize. If you need to change the order of the animations in your presentation, click on the movement marker and move the animations around as you like.
Pick Move Earlier or Move Later to change the request, the animations show up in the slide.
Apply Animations to Groups in PowerPoint
- Select the object and shaps you want to group.
- Then click Shape Format,
- then hit Group, and Group again.
- Now, this group of objects will be treated as a normal object, and you can apply animations as you would on a normal object.

Apply an Animation on a Text Box
Congratulations on making it this far in this tutorial of how to turn a PowerPoint into a video. In this last part, I will explain how to apply an animation to a text box in Powerpoint. This is super simple. Just click the content/text box you wish to animate. Then, hit the Animate section and pick the animation of your choice.
The subsequent stage is to tap the dropdown menu beside the animation you just included. This is somewhere else where you can choose when you need it to begin. Browse Start On Click, Start With Previous, or Start After Previous.
Hit the dropdown again alongside the content activity, and this time select Effect Options.
Here is the place you will set the direction, timing, and other movement alternatives.
When you are done finishing the above steps, you can utilize the straightforward method I introduced at the beginning of this article. Then, you can turn a PowerPoint into a video in just a few simple steps.
Final Words on how to turn a PowerPoint into a video
This was all for this time, a slightly longer article than usual. Now you know in detail how to turn a PowerPoint into a video. This is actually very useful, and once you have converted your first PowerPoint into a video, you will find several areas when this is a good fit.
Are you a teacher and have to teach your students away from home? Perfect, then, this is a very good method of creating engaging teaching. Maybe you do not have the resources to live-stream lectures. No problem. Turn a PowerPoint into a video, just as I described and publish it on YouTube, students can see the lecture when it suits them.
