

Google Slides is an awesome presentation tool and it’s only getting better with the recent additions to its audio and sound features [2021]. Can you easily add audio or sound in Google Slides? Yes! It’s a great way to make your presentation or slideshow stand out and it’s a breeze to do.
In this how-to add audio or sounds in Google Slides article, we’ll walk you through every step of the process, plus you’ll learn:
- About research into enhancing a message with sound or audio.
- Examples using audio or sounds in slideshows and presentations
- 7 quick steps how-to add audio to Google Slides, no sound engineering skills required!
- More Google Slides tips and techniques for recording audio, sharing your presentation or slides plus more.
Jump into the world of Google Slides with your new slide buddy. We have created this article to help you make more impactful, creative, and memorable slideshows that draw people in. Adding audio is simple but also tricky as there are so many different ways we can infuse it into our presentations. For more articles on how to create better slideshows check out our other tips for presentation creators
Enhance a message with sound and audio.
Many articles have been written about how sound can be used as a creative communication tool to help grab attention and create an engaging experience .
In 2018, PHMG published the first findings of its research into the impact of music in marketing, messaging, and branding. This study was conducted in Australia, UK, and the US to 1000 consumers in each country.
The study found that over 60% of people believe sounds, such as instrumental music and audio clips can be more memorable than visuals and influencing emotional reactions.
Understanding that sound can make a difference in how we feel and help convey a message, let’s explore how you could use this in presentations to help captivate, persuade or entertain!
Examples of using audio or sounds in slides
So how can we use audio or sounds in our presentations? Here’s 6 examples and benefits!
- Add background music or song to your presentation to help create a certain emotion or ambience you wish the audience to feel.
- Insert an audio clip to a slide so that someone viewing it on their own can understand more about the context of each slide.
- Add a sound effect to animation to create a more immersive experience or emphasize a key point to guide the audience’s attention.
- Embed a narration or voice-over to each slide to make your presentation more inclusive for people with visual impairments or to provide guided instructions.
- Insert a sound bite or speech from a famous individual or subject matter expert to add authenticity to quote or image.
- Use a digital recording during your presentation to give you a chance to take a pause and stop talking!
Below you’ll also find some more creative ideas on using audio clips or sound bites to make your presentations more interactive and engaging for your audience.
I could talk more about the benefits of adding audio to your slides or presentations, however, this topic deserves its own article! It would be great to know if this would be of interest to you? And if you would like to share your examples of using audio within Google Slides, just drop a note in the comments at the bottom of the page!
How to Add Audio to Google Slides
Quick Guide
Step by step
Step #1: Upload your audio file to Google Drive.
To learn how to upload an audio file to Google Drive see our article on working with PowerPoint and Google Drive, as the same steps are required for voice, music, or sound files.
Jump to the record, create, or where to download audio files #tips if you don’t have one!
Step #2: Share your audio file in Google Drive.
If you are not presenting in person and are sharing slides, for example through email, social network, or other messaging services, it is important to ensure the right permission settings have been applied to your audio file.
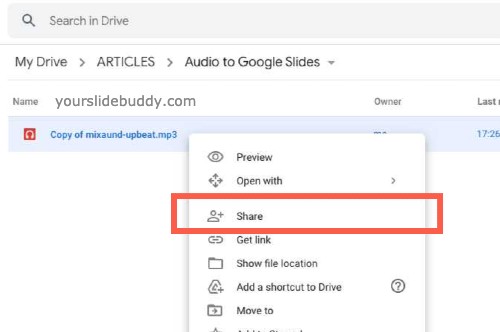
Once your .wav or .mp3 audio file has been uploaded to Google Drive
Right-click the audio file choose Share
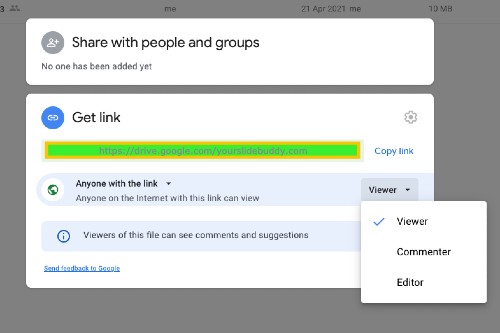
Under Share with people and groups pop-up window, enter the email address you want to share with.
Within the the “Get Link” section, change from “Restricted” to “Anyone with the link”
Select Viewer (or Editor, Commenter as required.)
Step #3: Navigate to the insert audio option
The image below shows where you can find the Insert ‘Audio’ option.
At this time [April 2021] it is only available for computers/desktops, and not available on Android, iPad, and iPhone apps. However, this does not prevent your viewers from hearing your audio on their mobile devices.
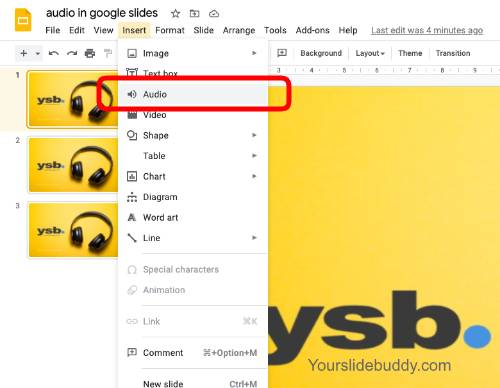
In Google Slides, choose a slide.
From the menu, select Insert > “Audio”.
Step #4: Select your audio file from Google Drive
One of the tricky things I find when embedding my audio file or files to my Google docs is actually finding the audio file. So here are a couple of #tips!
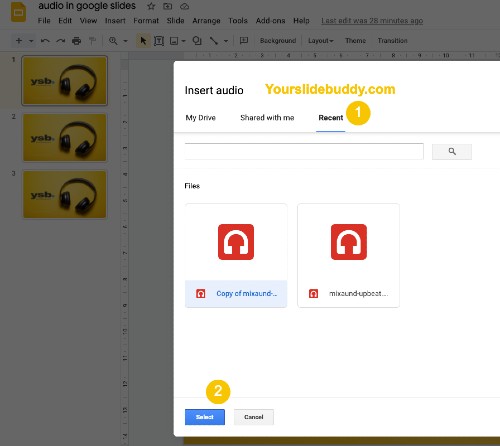
The first place I look for my files is in the ‘Recent’ Tab on the Insert audio pop-up window (see #1 in the image).
If this doesn’t work for you it’s best to use the ‘search’ bar.
#tip If you are using multiple audio files in your slideshow, number and name your files clearly, to help you add the right file to the right slide.
Step #5: Position the audio speaker icon on your Google doc as required.
Once you have selected your file as above the speaker icon will appear on your slide after a moment. You can resize, click and drag it to any desired position
Pro #tip! Instead of using the standard audio playback/speaker icon on your slide, get creative and personalize it!
To personalize the audio playback icon:
- Right-click the audio /speaker icon
- Select Replace Image from the menu.
Make a choice from the options available, such as from Drive, Photos, By URL, Camera, local system, or even search from the Web.
Step #6: Select the audio format options as required.
Google Slides offer many format options to help you create the embedded audio experience you require.
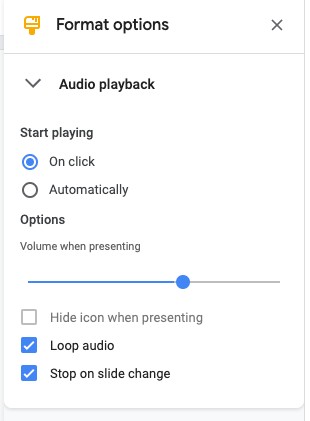
You can set up your Google Slides presentation to start playing your audio when you click on a slide or automatically play audio recordings once the slide is viewed.
The volume slider lets you set the right volume of the audio. This is really handy if you want just soft background music playing while the presenter is speaking at the same time (or to play a loud intro or outro to depending on your goals.)
There are other interesting ways you can use your audio clips. For example, looping the sound so that it repeats a short sound clip over and over again.
If you want your audio to continue playing through the entire presentation or across multiple slides then uncheck that box where it says “Stop on Slide Change.”
Further down the side menu are many styling options that you can apply to the playback speaker icon.
Step #7: Test your embedded audio file hit the “Present” and “Share” button at the top right.
You’re now able to play audio or sounds in Google Slides, so it’s time to test it thoroughly.
Share the link to a friend to help check your file and the slide presentation is viewable and playable.
#tip Remember to check that people can play your audio by using the Access checker before you share a presentation! As step #2, use the Access checker to make sure people can hear your presentation. If they don’t, the Access checker will suggest changing the permissions.
Step #8: Presenting or sharing your slideshow.
With Google Slides you have a number of options available if you want to share your slideshow when you are not available to be present in person.
Embed your Google slideshow with audio on a website or blog or share it with a large or non-restricted audience.
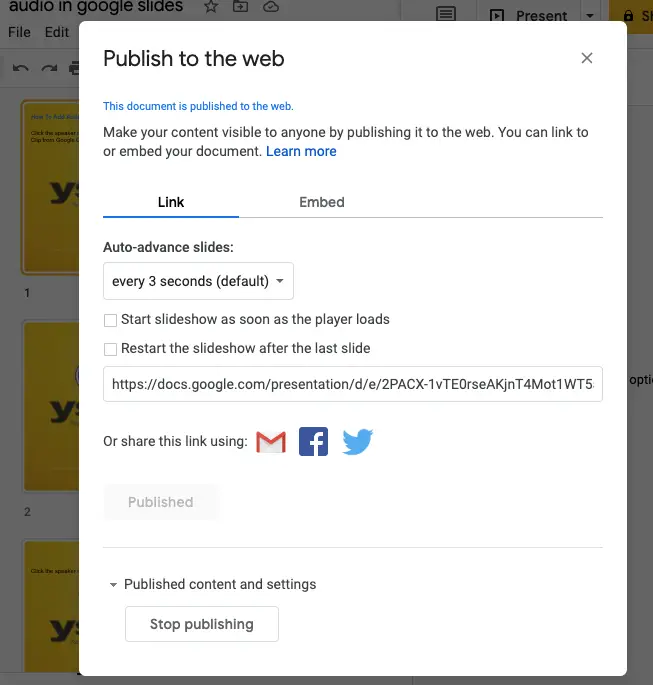
“Publish to the web” is the best way to share it widely while giving you control to turn on or off the publishing status.
To start, in Google Slides
Go to the “File” menu option and click “Publish to the web”
Click the tab labeled “Embed” or “Link” depending on your website integration options available.
Choose the options to specify how the slideshow starts, ends, or loops, or how big the slides should show by choosing the “Slide size” or “Auto-advanced slides” settings.
Then you are ready to hit the Publish button.
Copy and Paste the code provided onto your webpage or blog or share the link (URL) with your audience.
Sharing your slideshow to a specific person, group, or audience.
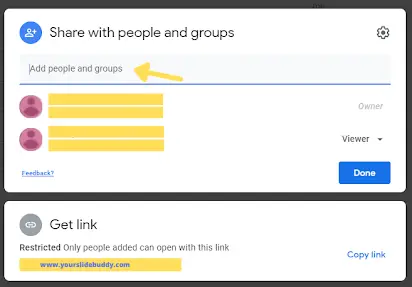
If you have sensitive information or don’t want everyone to be able to view your slideshow then follow the detailed instructions outlined in Step #2
- Add the people and group in the Share with people and groups section.
- In the Get link section, ensure Restricted is selected.
- Click the “Copy link” to provide the link to your audience over email, WhatsApp or other messaging app or platform.
Audio and sound Google Slides tips.
Above I have detailed the step-by-step approach to how Google Slides allows you to insert sounds to a presentation or slideshow, now itʼs time to dive into sharing some helpful tips that will maximize engagement and other ways to make an impact.
Record, create, link to or download audio files for your slideshow or presentation.
Above in Step #1, I outlined how to upload an audio file to Google Drive, however what if you don’t have one available to upload yet? Let’s look at 3 options on how you can record, create or find audio file to upload, embed or link to.
1) #Tip. Record your own voice for your slides.
If you want an exciting voice but can’t find the right person for the job, try recording yourself!
For your own audio narrations or voice overs a PC, Mac, mobile or tablet will allow you to record your own audio which you can then upload to your Google Drive.
There are also free or paid online services and applications available to record just audio (or audio and video) such as an online voice recorder, Audacity, or Movavi, which offer added features, that are easy to use and cost-effective options or free.
Google suggests using mp3 and .wav audio files in our Slides presentation even though Google Drive, supports MP3, MPEG, WAV, .ogg, .opus audio file formats.
So to avoid playback issues with Google Slides docs we recommend using an audio file converter if your audio file formats are not already available as .mp3 and .wav formats.
RECORDING YOUR VOICE TIPS
If your audio quality is poor people will be less likely to listen and learn from what you have to say. Here are some tips on how to create a great recording of your voice.
- Speak close to the mic, to avoid echo or feedback.
- Record in a quiet place where there’s no background noise like TV or music playing.
- Rehearse it.
- Before you start recording, take a deep breath and relax!
2) #Tip. Linking to audio files on the internet or online streaming services.
You can also add music or to your Google slideshow by way of embedding a link to streaming music platforms such as YouTube, Amazon Music or Spotify.
To embed or link to a streamed soundtrack or video from YouTube: Once you have copied the shareable link, in Google Slides navigate to > Insert > Video> and paste the copied link. Then format and position your embedded video as required.
When using YouTube content in Google Slides, one very useful feature is being able to trigger the video to play automatically, ‘on click’ or manually, and set it to play from a specific start time to end-time.
To link to an online music subscription service such as Spotify, Amazon Music, Apple Music, or Google Play: Once you have copied the shareable link, in Google Slides navigate to > Insert > Text box > Format the textbox as required > With the Text box still selected from the Insert menu, choose link> paste your link in the box provided. Then format or position your embedded YouTube video as required.
While it is possible to link to an audio file or online streaming services, there are some things to consider:
- Be careful around issues such as copyright, sharing permission or interruptions with Ads
- If you are presenting your content an internet connection would be required to connect to the online streaming service.
- If you click a link that to a URL, it will also open the linked page or app in a new browser window.
3) #Tip. Downloading audio files from a website or app.
There are a number of free and paid services such as archive.org, pixabay, free music archive or Storyblocks, that allow you to download stock music, sound effects, background sounds and more.
When going down this route be aware of the various copyright, royalty or Creative Commons license requirements. As you may have to provide attributions, pay a fee or agree to certain terms and conditions depending on how it will be used or distributed.
Sharing your audio presentation – #Tip. File permissions with Google Drive.
Note: You can only share files that you own or have edit access to.
Sharing files is often a challenge but don’t worry we’ve all been there! Having the power to protect access to your files is one reason Google Drive is so great.
To avoid or solve the common “you need permission”, “you need permissions to play this audio file”, ‘request access for that audio file’ or “request access permissions” error messages when trying to make your slideshow with audio public:
- To make permission sharing simple, keep all your slide assets including .mp3, .wav audio files or .mp4 files in the same folder as your slide deck.
- Double-check the sharing permissions you have granted for your audio file in Step #2 are set to both: “Anyone with the link” and set as “Viewer” (or editor, commenter).”
- If your Google account is through a nonprofit, business (work), or education (school) organization, check that your administrator has allowed users outside your organization to view (comment on or edit shared) files.
- As per Step #7 thoroughly test your presentation and file permissions before you present or share. To do this > Click the “Share” button from Google Slides > From the “Share with people and other groups” window > “Copy Link” to your clipboard. Then share the link to a friend to help check your file and the slide presentation is viewable and playable!
Start or stop an audio presentation playing automatically.
To play background music for the whole duration of a slideshow (photos slideshow) for a celebration or gathering e.g. a presentation night, birthday, graduation or wedding event or other memorial service that is going to be continuously running in the background. Follow the steps below.
To loop the same audio file across all slides automatically (as shown on Step #6 above )
- Click the audio icon in the Google slide
- Select Audio Playback > under Format options sidebar
- Choose start playing as “automatically”
- Adjust the volume settings e.g. for soft background music lower the slider where Options > volume when presenting is displayed.
- Check (tick) “Hide icon when presenting”.
- Check (tick) the “Loop audio“
- Uncheck (remove tick) “Stop on Slide Change”
Now when you click “Present” the sound file will continue even when the slides changes, perfect for when you want your slideshow running on auto-pilot.
To loop a slideshow with continuous background music that is shared with “Publish to the web” (as shown on Step #8 above with either ‘link’ or ’embed’) configure these settings in Google Slides:
- Repeat the loop audio steps above.
- File menu > “Publish to the web“
- Choose the interval or speed the slides should auto-advance (autoplay). I would recommend selecting a minimum auto-advance of every 5 seconds.
- Tick if the slideshow should start as soon as the slide player loads (or not).
- Tick restart the slideshow after the last slide to loop the slides continuously if desired.
Summary
We’ve covered a lot of ground in this article about how audio or sounds can be a powerful tool to help keep people engaged throughout your slideshow presentation, how to add audio or sounds to Google Slides and also share it with your audience.
Now you have the know-how it’s time to put your ideas into practice!
One very simple, original and creative way to make a memorable presentation is to add a famous voice-over to the start of a presentation or using a soundbite to end a presentation to reflect your message.
If you need help adding audio into Google Slides, let us know! Our team has experience working with Google Slides so we would love to talk about how best to plan out your upcoming presentation incorporating our tips from this article.
Have any of these methods helped make your next presentation more engaging or would you like to show us your examples? Share in the comments below!
This article walks through and displays images of the desktop web browser experience that is currently live at the time of the article edit [May 2021]. As Google Slides is an evolving product with new features being introduced regularly, some of screen designs or wordings may have changed by the time you are reading this article. We aim to do our best to keep are articles updated, however we always appreciate your feedback if any changes have been observed.
