

I’ve scrolled through a lot of slideshows and, let’s face it, they’re not always the easiest to follow or understand what’s going on. I’m sure you have felt this too.
Have you ever thought, it would be great if the slides came with audio so that the presenter could explain and talk through each slide?
In this article, we’re going to show you how to record audio in PowerPoint as a narration or voice-over so your audience can feel as if you are presenting live and in person.
All you have to do is record yourself talking through each slide and PowerPoint will take care of the rest!
Related topic: If you are only looking to insert or add an audio that does not advance or move a slideshow in time and in synch your voice, this article: Adding Music to PowerPoint Slideshow explains how.
How to record audio as a voice-over or narration in PowerPoint – Quick Guide
Why use narrations or voice-overs in PowerPoint Presentation?
Adding a narration or voice-over into a presentation will enable your slideshow to be played and move forward in time or sync with your voice.
Recording audio for your slideshow is a widely used feature and has many benefits. For example:
- It’s useful in situations when a speaker is not available and when people want to view presentations on their own and at their leisure.
- It is also an effective way for speakers to rehearse and time specific slides or the entire presentations before they happen.
- And you may have watched many instructional videos or online courses with a recorded voice over, just because it makes the content easier to understand, is more engaging and lively than just written words alone.
After you finish the audio recording you can share or export your presentation by converting or exporting your PowerPoint (.ppt) file into a video (.mp4 or .mov file) which will have both your audio and visuals contained in one file.
Before recording your narration or voice-over – tips.
Make sure your microphone works.
An important step to take before recording your audio is to ensure your microphone is set up correctly and your voice can be played back clearly. The video below runs through how to set up an external mic for your Windows or Mac.
First, plug in your headset or microphone to your computer if you are not using the inbuilt mic. Or if you are using a Bluetooth headset, make sure it’s paired/connected properly.
To make sure everything is working OK, access the audio device settings on your computer as shown in the video above. While you are in the device settings menu, select your microphone and set it as default.
You can test the playback quality by using the free software tools on your machine:
- Windows 10 – Use Voice Recorder (previously called Sound Recorder)
- Mac – Use Voice Memos
- Chromebook – New in 2021 from OS 88. UseScreen Capture to test your audio recording by pressing the Ctrl, Shift, and Overview keys to bring up the capture bar. (You may need to enable by entering chrome://flags in the URL address bar and search for “capture” in the search bar or by entering chrome://flags/#screen-capture in the URL address bar.)
Note – In PowerPoint 2016, you cannot change which microphone device you want to record in screen recording mode (so do it first!), however in 2019/Office 365 it is possible to do so, by using the settings link in the full-screen recording mode.
How to Record Audio in PowerPoint Step-by-Step Instructions.
- Start by opening the PowerPoint presentation in which you want to record your audio.
- Navigate to the Slide Show tab, and select Record Slide Show button.
PowerPoint versions 2019 / Office 365 for PC/Windows users: Can setup the Recording tab which makes it easy to access any of recording tools from one place jump down to read how to setup the Recording tab.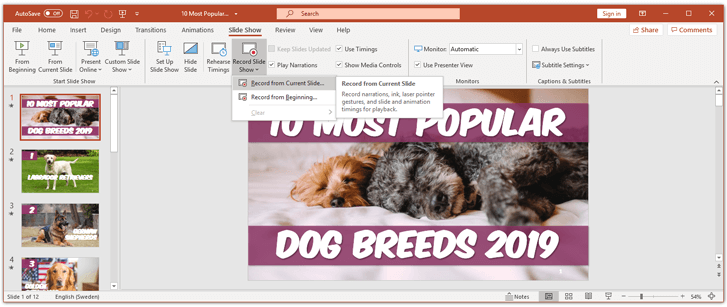
Make sure to select the first slide in your presentation if you want to record audio for the entire presentation or choose “Record from the beginning” from the sub-menu shown above. - Set Your Slide Show Recording Preferences.
Note this step is only for PowerPoint versions 2013 – 2016 for PC/Windows. / PowerPoint 2019 / Office 365 users can skip to step #4
After choosing the recording option the following dialogue box will appear: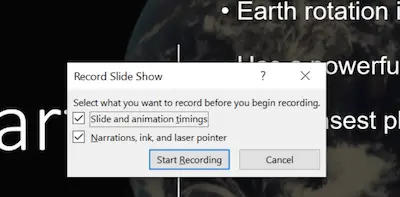
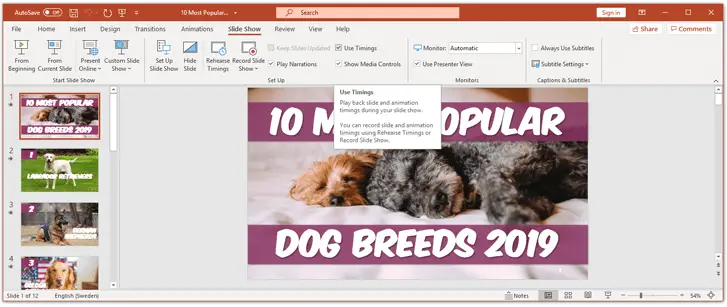
Slide and animation timings. This option allows you to sync your speech with the slides and animation timings.
Narrations, ink, and laser pointer. This option allows you to record narrations and you must have this option enabled in order to record audio in PowerPoint. Read more about the ink and laser pointer below.
Let’s leave these options as checked as it will not affect your final slideshow. You could also access the options in the Slide Show ribbon.
- Record your PowerPoint Audio
When you press the record button, PowerPoint will go into full-screen mode.
PowerPoint 2013-2016 – will open into full screen mode and will start recording immediately.
PowerPoint 2019 / Office 365 – will open into full screen recording mode:
Start Recording. PowerPoint will start recording audio after a 3 second countdown after clicking the Record button. Or keyboard shortcut – Press R
Change Slides. When you have made your introduction or completed the audio for this slide, it’s time to advance to the next slide, by using the Next (or previous) arrows to jump to through the slides. Or keyboard shortcut – Press spacebar.
#TIP: PowerPoint cannot record your narration and change a slide or apply a transition at the same time, so pause speaking until, the slide has advanced.
Recording Controls:
Pause Recording. To pause / un-pause recording your voice and the timings, click Pause / or un-pause, if you need to take a breath or need a moment to think.
Clear Recording. If at any time you make a mistake and wish to record all the slides or just the slide you are on again, click the Clear (x) button - Stop Recording. To end the slideshow recording, click the Stop (square button) at the top left. Or keyboard shortcut – Press Alt+S.
You’re done recording your captivating and engaging PowerPoint slideshow with a voice-over / narration! - Exit full screen recording window. Click the (x) button int the corner.
To save your slide timings, click “yes” if prompted.
When you return to your slide view, a small icon of a microphone appears on the bottom right corner of each slide.
Click this icon to hear your voice over for any particular slide.
Advanced PowerPoint Audio Recording Options.
Add Annotations to Your Recorded PowerPoint Slide Show.
Adding annotations to your PowerPoint presentation is an optional step and can help your presentation stand out. But, what are annotations, and how should you use them when recording your voice-over?
If you want to draw a user’s attention to a specific area or to add some interactivity; using annotations is the way to do it. It is basically a virtual marker you can use to highlight elements in your presentation slides e.g by circling a word or picture, underlining a phrase, writing additional notes on-screen, or pointing to specific items.
To use the Annotation Tool in PowerPoint:
Scroll to the bottom of the full screen recording view (as shown in the image below).Then, select any of the tools available (the laser pointer, highlighter or pen) and annotate your slide, by drawing with them using any mouse or other pointing device.
Note, this will not make a permanent change to your slides, it’s only visible in the recorded playback!

Using the Timings Function to Adjust Recording Speed.
As you record your narration, you will be able to see a clock in the bottom left corner showing how much time you spend on each slide, against the total amount of time recorded so far.
While this is very helpful for rehearsing your presentation, it’s quite common to have issues with timings with your recorded slideshow. For example when you have switched to the next slide too quickly.
To Change the Timings of Your Recording:
Navigate to the Slide Show tab in the top ribbon > (Next to the Record Slide Show icon, we used before) > click the Rehearse Timings icon.
The presentation will now once again go to full-screen mode, and you can use your arrow keys to change the slides and set new timings.
Clearing or Deleting your narration and / or timings
If you are not happy with your voice-over on a slide or wish to start the recording from the beginning, PowerPoint gives you some easy options to do so.
To Delete a Narration or Timings:
Navigate to the Slide Show tab in the top ribbon OR the Recording Tab.Select the down arrow on the “Record Slide Show” button > from the menu choose “Clear” > Select the appropriate timings and/or narration option.
Save and Distribute the Presentation with Audio as a Movie / Video file.
Now that you are finished recording your PowerPoint presentation, your voice audio will be attached to the same file and it’s time to distribute it by exporting your PowerPoint (PPT file) into a video (.mp4 or .wmv).
To Export your Presentation as a video:
In PowerPoint navigate to File Menu > Export > Select your preferred options. (E.g.) File Format: MP4. Quality Width 1,920 Height 1,080
Recording Audio Tips and Tricks
MacOS 2019 – PowerPoint Audio Recording Tip
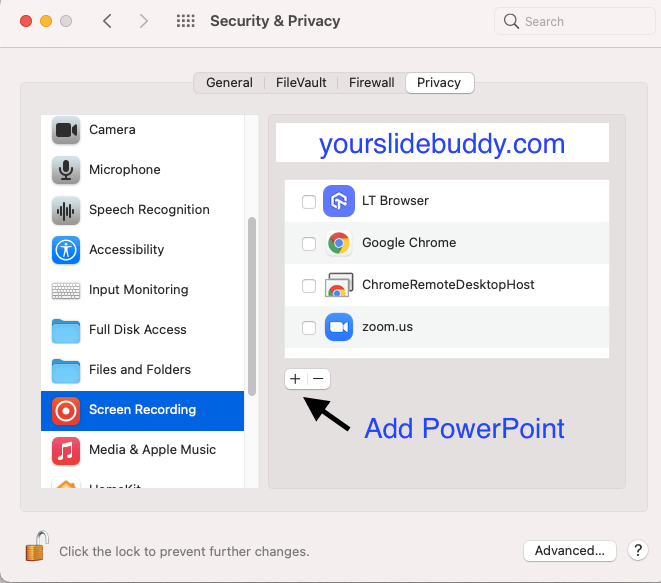
To give PowerPoint access to record your screen in macOS you need to set up the right security and privacy permissions:
- Open System Preferences
- Select Security & Privacy
- Select Privacy tab.
- In the left panel scroll to Screen Recording > click “+” icon.
- In the “Applications” window select PowerPoint
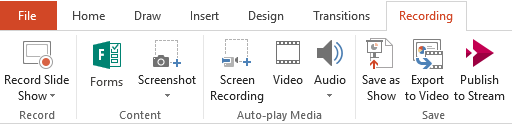
Microsoft 365, 2016, 2019 for Windows PC – Recording tab in PowerPoint
Microsoft 365 subscribers with the Click-to-Run version of Microsoft 365 for Windows PC can use the Recording tab.
The Recording tab shows the recorded video, screenshots, and screen recording options in a single menu for easy access.
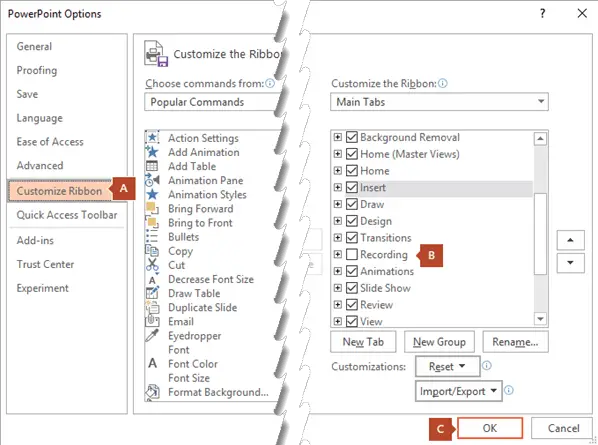
To turn on the Recording tab of the ribbon in PowerPoint 365 Windows PC
- Select the File menu > click Options.
- In the PowerPoint Options dialog box > click Customize Ribbon
- In the right-panel > select the Recording check box.
- Click OK.
If you click the button on the bottom of the “Record Slide Show” button, you can start from the beginning of the slideshow or from where you are.
Conclusion
Knowing the basics of recording audio in PowerPoint is a powerful tool for anyone who wants to make a downloadable slideshow, create an internet streamed webinar, upload a video for YouTube, Vimeo, or any other digital platform such as your website or other digital platforms.
You may also like: How to Turn a PowerPoint Into a Video
