


In Microsoft PowerPoint, we can create engaging and effective presentations for different purposes and audiences. However, sometimes the default settings in PowerPoint are not good enough for us, and you have to change them. An example of such a setting is the orientation of the slides. Sometimes it is appropriate to use portrait orientation, and sometimes landscape orientation is more appropriate. In this article, you will learn how to rotate PowerPoint slide.
How to Rotate a PowerPoint Slide
How to rotate a PowerPoint slide? The easiest and fastest method of rotating a PowerPoint slide is to follow these four simple steps:
- Select “Design” in the top ribbon.
- Find and click “Slide Size”, in the Customize section.
- Click “Custom Slide Size”.
- Click “Portrait” in the Orientation, Slides section.
Now you have successfully rotated your PowerPoint slide. The method described above is the fastest and easiest method of how to rotate a PowerPoint slide. However, there are more ways to make your presentation even better with this tool. Continue reading for more great tips when rotating a slide in PowerPoint.
Speaking of rotating, did you know you can rotate text boxes in PowerPoint? Read this article on how to curve text in PowerPoint.
Change PowerPoint Slides From Landscape to Portrait
The default slide orientation in the newer versions of Microsoft PowerPoint is the widescreen landscape mode. Btw, check out this step-by-step tutorial on how to change slide size in PowerPoint if you want to change the slide size.
Okay, let’s rotate a slide in PowerPoint. First, open the presentation in which you want to rotate some slides. Then:
1. Click the “Design” tab in the top ribbon.

2. Now, navigate quite far to the right-hand side of PowerPoint, locate the “Customize” section and click “Slide Size”.
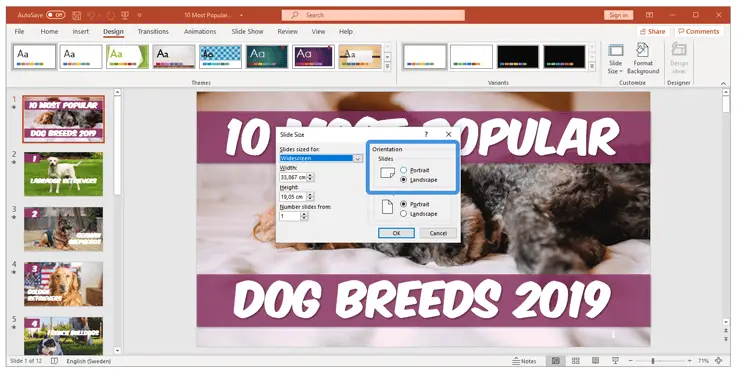
3. Continue by clicking “Custom Slide Size…” in the drop-down menu, and a dialogue box will appear.

4. Navigate to the “Orientation” part of the dialogue box and change the slide settings from “Portrait” to “landscape”. Now, click “OK” if you are satisfied with the other settings.
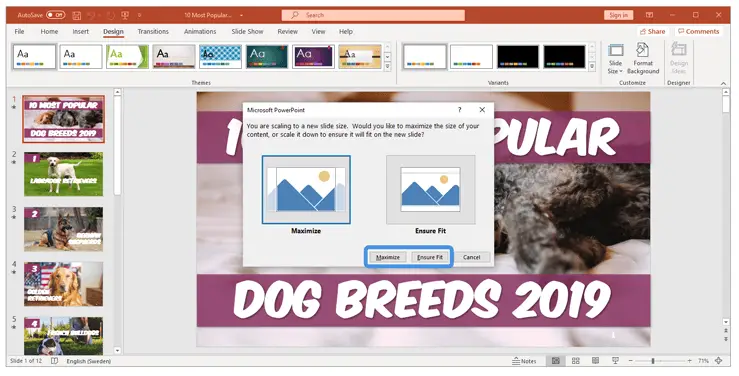
5. A new dialogue box with two illustrations now appear in your workspace in PowerPoint. The illustrations display how the two different options will affect the appearance of your slide. Select either “Maximize” or “Ensure Fit”, and click “OK”.
Well done! You have now successfully rotated a slide in PowerPoint. I hope we now have answered the question of how to rotate PowerPoint slide. However, there are situations where you may want to mix vertical and horizontal slides in PowerPoint. You are in luck; in the next section, we will explain to you how to achieve that.
Use Vertical and Horizontal Slides in the Same Presentation
Unfortunately, there is no simple way to achieve this in PowerPoint. If you are a Google Slides user, you know this is a basic feature in that software, but now in PowerPoint…
However, there are some workarounds you can apply to achieve this, and the most common technique is to link two PowerPoint presentations. The vertical and horizontal slides do not appear in the same presentation, but you create an illusion that they are in the same.
To combine two presentations, you need to format them correctly first. Make sure one of the presentations is in horizontal mode, and the other presentation is in vertical mode.
Now, open the “main” presentation in which we will create the actual link. Select some element in your presentation, such as a text box or another object. This element is what we will use to create the illusion. When the object is clicked during the presentation, the other slide opens.
As you may have noticed, this way of combining slides is not as easy as just rotate PowerPoint slide. However, if you just follow the steps below, you can achieve the illusion of presenting horizontal and vertical slides in the same PowerPoint presentation.
- Navigate to “Insert”
- Go to the Links group and click “Actions.”
- Select “Mouse Click” or “Mouse Over” to select how to trigger the link.
- Select “Hyperlink to” and select “Other PowerPoint Presentation.”
- Locate the second PowerPoint presentation, click it, and select “Open.”
- A list of the slides in the second presentation appears; select one.
- Click “OK” two times, and the second presentations are now linked.
Now, when you click the element that will trigger the link to the second presentation during your presentation, it will transition over to your second presentation. Probably your audience will not even notice the seamless transition.
Before we end this section, I just want to highlight a risk with this method. A link between two presentations can easily be broken in PowerPoint. If you for any reason delete or even change the location of the linked PowerPoint presentation, the link will be broken.
To avoid the link to be broken, ensure to make a note in the notes pane that the presentation is linked. Another good idea is to put the two presentations in the same folder, either on your own computer or in a cloud storage.
Did you know: There are several ways to delete slides in PowerPoint. Read this guide on how to delete a slide in PowerPoint to learn various methods and best practice tips.
Rotate a Slide in PowerPoint Online
How to rotate a slide in PowerPoint online? You may ask yourself why I even bring this up. Isn’t it the same method as to how to rotate PowerPoint slide as I mentioned above?
In fact, for a very long time, Microsoft didn’t enable this feature in PowerPoint Online. However, now you can achieve this quickly by following the steps listed below.
- Select “Design” in the top ribbon.
- Find and click “Slide Size”, in the Customize section.
- Click “Custom Slide Size”.
- Click “Portrait” in the Orientation, Slides section.
Done! You have now successfully rotated a slide in PowerPoint Online.
Conclusion
In this article, we have answered the question; how to rotate PowerPoint slide. If you just came down here for the conclusion, the fasted way to change orientation or rotate a slide in PowerPoint is to follow the four steps below:
- Select “Design” in the top ribbon.
- Find and click “Slide Size”, in the Customize section.
- Click “Custom Slide Size”.
- Click “Portrait” in the Orientation, Slides section.
That was not that difficult, right? Changing the orientation of a slide or simply rotate a slide in PowerPoint is a very useful skill to bring with you in your PowerPoint skill toolbox.
A very useful situation when it’s great to know how to rotate a slide in PowerPoint is when you are inserting a portrait-oriented photo. It may look really awkward to insert that photo in a landscape-oriented slide.
Furthermore, did you know you can use both vertical and horizontal slides in PowerPoint? Of course, we have guided you, step-by-step, in this article on how to accomplish that. Did you miss it? Just scroll up a few paragraphs to read all about it.
Can you imagine some situations when it’s appropriate to rotate a slide in PowerPoint? Please drop a comment below and share your thoughts with us.
Happy PowerPointing!
